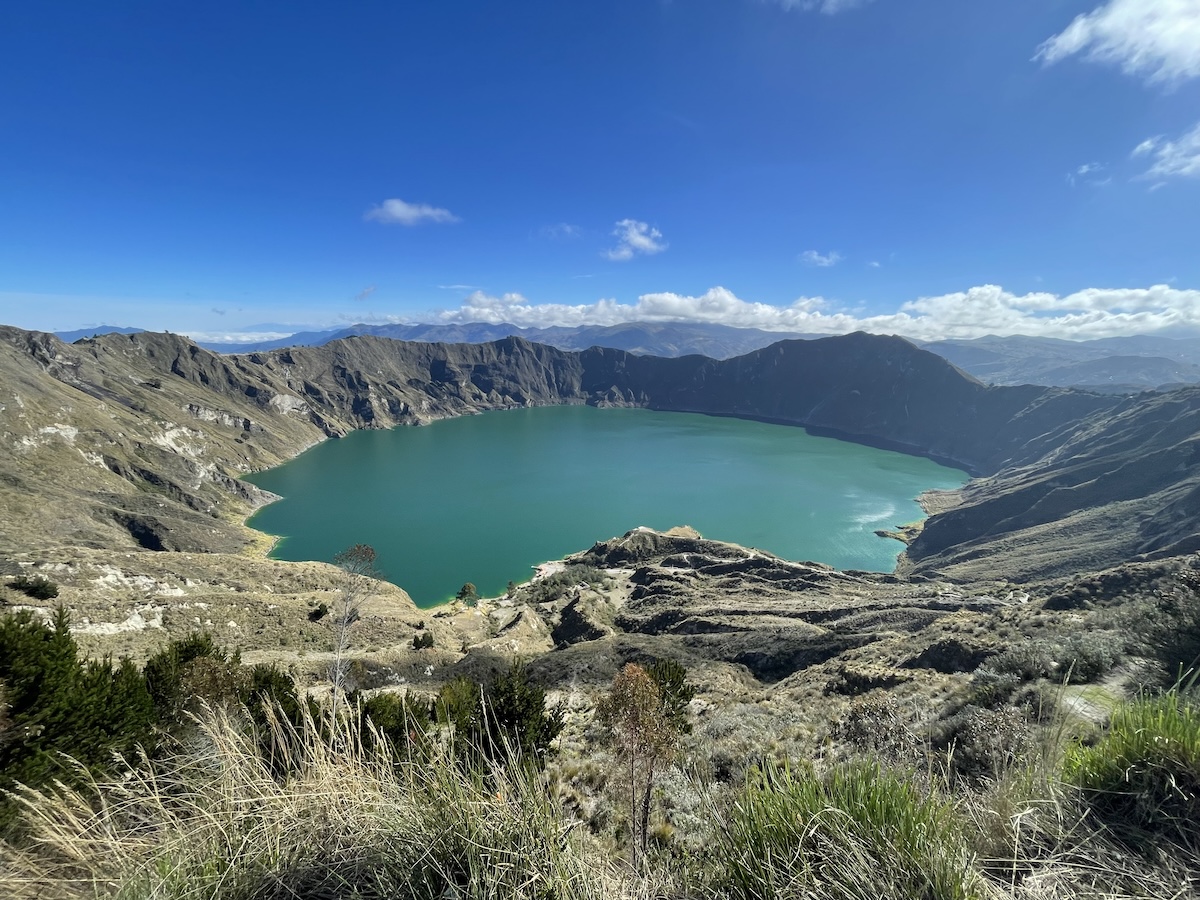
The Quilotoa Lagoon is a gorgeous, turquoise, lake that rests in the bowl of a steep volcanic crater. Views stretch out for miles around the crater’s rim. You can see plenty of rugged Andean hills covered in farms and ranch land and maybe even the snowclad peak of Cotopaxi Volcano peeking out over the clouds. Quilotoa is a beautiful place.
That’s why it’s also one of Ecuador’s most popular tourist sights. Some come on a day trip from Quito to glance at the lagoon, before being herded into an overpriced tourist restaurant. Others come to hike the famous Quilotoa Loop, a series of trails that wind between high-altitude indigenous villages. We came to stay in the nearby town of Zumbahua and hike around the crater rim. It was one of our most difficult, and best, experiences in all of South America.

What to Know About Quilotoa
Quilotoa is one of Ecuador’s major volcanoes, with a massive three kilometer (two mile) wide caldera. The lagoon that fills the bottom actually hides various volcanic fumaroles, which create hot springs in parts. Swimming, however, is strictly forbidden. Various volcanic minerals give the lagoon its distinctive greenish color.
A village, also called Quilotoa, rests at the rim of the crater. It’s full of touristy restaurants and over-priced hotels, geared more towards day trippers and upper-middle-class tourists than the adventurous, good-looking travelers who read this blog.
A better village, called Zumbahua, is located a mere 15-minute taxi ride away and offers a much more interesting and authentic experience. There are other indigenous villages and farming communities sprinkled throughout the region.

How to Get to Quilotoa
Quilotoa and Zumbahua are relatively easy to get to from Quito. I have heard rumors of a direct bus from Quito, but I can’t confirm this personally. I do know that you can easily transfer in the nearby town of Latacunga.
If you’re coming from Quito, take any bus headed to Latacunga from the Quitumbe terminal. You can also catch these buses from anywhere along the Pan-American highway. Near Volcán Cotopaxi, for example. Buses go between Latacunga and Quito regularly and the trip takes about an hour and a half.
Latacunga itself is a nice little colonial town and not a bad place to spend a night. It doesn’t have a ton going on, but the colonial center is worth a stroll if you find yourself there with some extra time. Or if you happen to miss your bus.
Buses head from Latacunga to the Quilotoa area about once an hour or so and the trip takes just under two hours. Some buses go directly to the town of Quilotoa, while other’s stop in the nearby village of Zumbahua. I highly recommend going to Zumbahua, as you’ll see below.

Where to Stay Near the Quilotoa Lagoon
You could also, theoretically, stay in Latacunga and visit Quilotoa on a day trip. Again, the bus takes almost two hours, so you’d have to get up very early if you’re planning on hiking. Latacunga is pleasant, though, and the town has a larger variety of restaurants and other amenities than Zumbahua or Quilotoa. If you want to stay in Latacunga, you can click here to see your options.
You could also, in theory, stay in the town of Quilotoa itself. While Quiltoa is certainly cute, it’s very touristy. Restaurants and hotels are much more expensive than elsewhere in the area. The alpacas are there for tourist photos rather than wool or meat. We didn’t stay there, because we couldn’t find any accommodations in our budget. It all worked out in the end because we ended up in nearby Zumbahua.
On one of the most fun, but also most stressful, aspects of travel is finding and booking places to stay. These days you have options ranging from dirt cheap hostel dorms to luxurious White Lotus style resorts. Thankfully, the internet is here to make finding accommodation easier.
Hostelworld is the go to app for finding hostels. For everything else, there’s Booking.com. If you book through either of the previous links, I’ll gain a small commission at no extra cost to you.
Zumbahua, the Best Indigenous Village Near Quilotoa
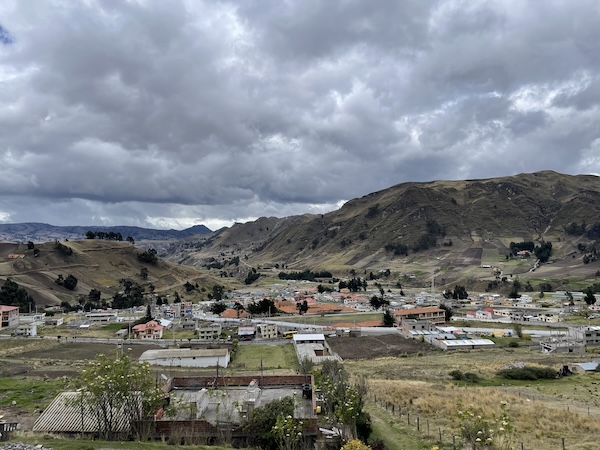
The best place to base yourself to visit the Quilotoa Lagoon, in my opinion, is to stay in the little village of Zumbahua. Zumbahua is an indigenous village that makes for a decidedly un-touristy counterpart to Quilotoa. There are only a handful of guesthouses and hotels, and maybe a smattering of restaurants. For the most part, Zumbahua is geared to local folks going about their local lives. You won’t hear any English here, and probably more Kichwa than Spanish.
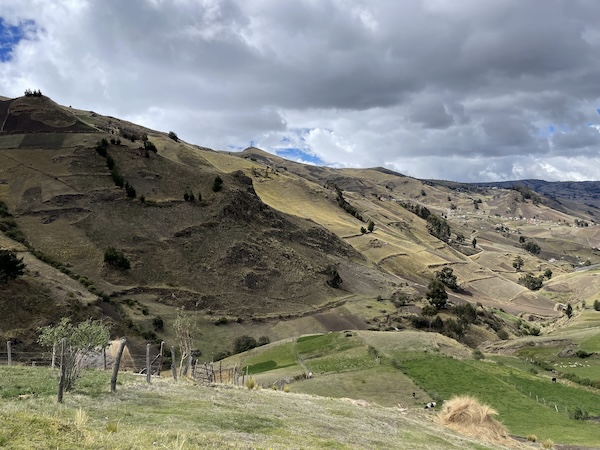
Zumbahua is also very pretty. Rocky cliffs surround the village, and dirt roads wind up the hillsides into a rural countryside filled with green pastures and small farms. It’s also quite poor. Houses here are rough, zinc-roofed, concrete or adobe affairs. We even stumbled on a traditional thatched roof hut. Perhaps because of that, Zumbahua seems to be a left-wing stronghold of Rafael Correa’s Revolución Ciudadana party.
Zumbahua is located only about 15 minutes from the Quilotoa Lagoon. There are buses that run back and forth, but it’s easier to take a taxi.
If you stay in Zumbahua, just remember two important things: first, be careful of the dogs. Second, remember to not take pictures of people without their permission. The traditional native Andean outfits are beautiful, but people aren’t wearing them to be props in your Instagram photos.
We stayed at Hostal Kuyllur Ñan in Zumbahua. Click here to make a booking. The rooms were comfortable and the woman who ran the place cooked us some pretty delicious meals, which were essential in a town without a lot of restaurants.
All bookings you make through this site give me a small kickback at no extra cost to you.
Weather and What to Pack for Quilotoa
The area around Quilotoa is cold, though. Maybe not middle of January in Minnesota cold, but way colder than any place near the equator has any right to be. Temperatures can dip down to nearly freezing at night, while during the day the highs rarely reach 60 degrees Fahrenheit. It feels colder since it’s also quite windy, and rain or wet mist can sneak up on you, especially in the afternoon.
Bring warm clothes. A decent jacket will do wonders, and I also appreciated having a nice warm hat and some gloves. Having a raincoat that you can layer with is also a good idea. You’ll definitely appreciate a nice cup of muña tea or hot chocolate at the end of the day.
I also suggest bringing a set of hiking poles. I used to be one of those guys who was like “I’ve got two feet; I don’t need no hiking poles.” But hiking around the rim of the Quilotoa crater convinced me how nice it is to have an extra bit of stabilization. The trails here are quite rocky and uneven. If you don’t want to bother with bringing a hiking pole on an airplane, you can find decent options in Quito.
Finally, don’t forget sun protection. The high altitude means that UV radiation is powerful here. I’d also recommend a wide-brimmed hat.

Hiking the Quilotoa Loop?
A lot of people come to Quilotoa to hike the famous Quilotoa Loop. This multi-day trek travels between various local villages, through the region’s rugged Andean scenery. I’m not sure why they call it a “loop” since it looks like a pretty straight line on the map to me, but what do I know?
We did not do this, however, so I can’t really comment on it. I’m sure it’s great. However, at the time we visited Quiltotoa, my wife was recovering from a knee injury, and we thought a remote hike in rugged Andean wilderness might not be the best way to test out how the surgery was holding up.
Instead, we opted to hike the rim of the crater around the lagoon. We thought that might be easier. It was the opposite of easy.
Hiking Around the Quilotoa Lagoon
Our hike around the rim of the Quilotoa crater was one of the most demanding and strenuous, but also most rewarding, hikes I’ve ever done. I’d even consider doing it again.
The lagoon itself is absolutely gorgeous, of course. The views from the heights of the crater rim out across the landscape were astounding. Pictures don’t do it justice. The hike itself was absolutely grueling, though. There were times I wondered if we were going to make it.
We started early, just after breakfast, when the morning mist was still clearing and before the day trippers arrived. The quiet of the morning was only broken by the locals of Quilatoa as they began to open their shops and restaurants and souvenir stands. We paid our two-dollar entrance fee and started the hike before the souvenir stalls finished opening.
The trail itself is pretty easy to find and easy to follow. It just goes around the rim and makes a big circle, after all. The ground was quite sandy and gravely, though. I’m glad we had decent hiking boots and our poles. Things felt safe, for the most part, but there were parts where the trail narrowed and skirted the edge of the steep crater.
We took our time at first, stopping for about a million photos that inevitably felt disappointing compared to actually being there. The crater itself remained gorgeous. On the other side, we could see the jagged Andes mountains and the snowy slopes of Cotopaxi in the distance.
While the rugged landscape was beautiful, it was this same rugged landscape that made the hike incredibly difficult. Every time we scrambled up one steep incline, we’d have to scramble back down again on the other side. Only to find yet another steep incline waiting for us. It went on like this around the entire crater.

Completing the Circle and Just Missing the Mist
When we had made it about halfway around, we stopped and took a break. My enthusiasm was severely dampened when I realized we were still only halfway around. We were both drenched in sweat, out of breath and our calves and hamstrings were aching. As we rested and tried to rally for the second half, a French family zoomed past us. The family included two little kids who leapt up on the rocks around the trail like tiny baguette-eating mountain goats.
Thankfully, there are a couple of little shops and rest areas around Quilotoa’s crater. Two to be exact. However, it was just enough for us to re-stock up on water and get a little snack to keep us going. The owner of the store didn’t seem very optimistic about our chances of making it around the rim, however.
Considering we didn’t have any other option, we ignored his pessimism and kept going. The second half of the hike seemed to be the hardest, but I don’t know if it was actually steeper or we were just tired. I began to ignore the beautiful surroundings in order to just focus on putting one foot in front of the other. I barely have any pictures from this half of the hike.
I did notice, however, some menacing looking clouds rolling over the mountains in the distance. As we hiked, those menacing clouds kept getting closer and closer. Even though the end of the trail seemed to stay the same distance away. Soon, the clouds started pouring over the other side of the crater and gliding over the water directly towards us.
The clouds loomed over our heads, threatening us, for the last quarter of the trail. By the time we eventually made it back to the town of Quilotoa, we were completely surrounded. All the beautiful views and mountain vistas had disappeared behind a wall of thick, grey mist. You couldn’t even tell there was a volcanic lagoon there.
We finished the day by treating ourselves to a huge meal and beers in an over-priced touristy restaurant. I probably slept better that night than I had in a long time.

Practical Advice for Hiking the Quilotoa Lagoon Crater
I wonder sometimes why that hike was so difficult. We’d already acclimated in Quito and elsewhere in Ecuador. Was I just out of shape? I don’t think so, but those French children might say otherwise. Either way, in case you don’t happen to be a French mountaineering child prodigy and are considering hiking around the Quilotoa Lagoon, I have some advice for you.
Most people say the hike takes four to six hours. It took us over eight. Give yourself extra time. Even if you are an expert mountaineer, if you blow through the whole thing quickly, you’ll miss out on those amazing views.
We left early, and I’d highly recommend doing the same. You want to make sure you have enough daylight to get back before dark. Also, mornings tend to be clearer, and trust me, the hike is no fun covered in clouds. Leave as early as you can.
Also, make sure to bring plenty of water. Yes, there are those two shops along the trail, but you really want to stay hydrated. It’s not like you can scale the sides of the crater and scoop up a drink from the lagoon.
Finally, the Quilotoa crater is at a very high altitude. This altitude can make everything more difficult, even if you think you’ve already acclimated. That’s my excuse, anyway. Drinking plenty of water helps. You can also do as the locals do and chew on some coca leaves to help with symptoms of altitude sickness. Coca leaves will also give you a much-needed burst of energy for the hike.

Final thoughts on the Quilotoa Lagoon
It took me a couple of days to recover from our hike around the Quilotoa Lagoon. Thankfully, our next destination in Ecuador was the town of Baños, famous for its hot springs. Despite this, I think our hike around the rim of the crater was maybe one of the best hikes I’ve ever done.
The views were spectacular, of course. And although the hike itself was difficult for us, that difficulty made completing the hike feel all the more rewarding. Especially considering we managed to avoid getting caught in a shroud of fog and clouds. On top of all that, the village of Zumbahua was a great little glimpse into indigenous, rural, Ecuadorian life.
The hike around the Quilotoa Lagoon isn’t easy, but it’s definitely worth it.
Useful Websites for Traveling Ecuador
As much as we might long for the days when you could show up to a town with nothing more than a beat-up guidebook and a sense of adventure, today much of traveling involves being glued to our phones making bookings. I’ve compiled some helpful apps and websites below that at least help make those bookings more convenient so you can spend less time staring at your phone and more time exploring at your surroundings. Some of these sites are affiliate links that give me a small commission at no cost to you if you chose to book through them. All of them are sites I’ve used personally and have no problem recommending.
Just be sure to do your due diligence as much as possible. Only hire local guides and try as much as possible to stay in locally owned hotels and hostels so that your hard earned travel dollars actually go to support the local economies of the places you visit.
Booking.com is basically the world’s only hotel booking website. They have hotels, guesthouses and vacation rentals all over Ecuador.
Hostelworld is the go-to site for booking hostels. If dorm rooms and shared bathrooms are your thing, you’ll find hostels all over Ecuador.
Get Your Guide offers tours and activities all around the world. Unlike some other sites and apps that do the same thing, you can actually find some reasonably priced deals here.